zhouweicsu

Vue2.0 源码阅读:模板渲染

本文基于 Vue.js 2.1.10

Vue 2.0 中模板渲染与 Vue 1.0 完全不同,1.0 中采用的 DocumentFragment,而 2.0 中借鉴 React 的 Virtual DOM。基于 Virtual DOM,2.0 还可以支持服务端渲染(SSR),也支持 JSX 语法(改良版的 render function)。

基础概念

在开始阅读源码之前,先了解一些必备的基础概念:AST 数据结构,VNode 数据结构,createElement 的问题,render function。

AST 数据结构

AST 的全称是 Abstract Syntax Tree(抽象语法树),是源代码的抽象语法结构的树状表现形式,计算机学科中编译原理的概念。Vue 源码中借鉴 jQuery 作者 John ResigHTML Parser 对模板进行解析,得到的就是 AST 代码。

我们看一下 Vue 2.0 源码中 AST 数据结构 的定义:

1
2
3
4
5
6
7
8
9
10
11
12
13
14
15
16
17
18
19
20
21
22
23
24
declare type ASTNode = ASTElement | ASTText | ASTExpression
declare type ASTElement = {
type: 1;
tag: string;
attrsList: Array<{ name: string; value: string }>;
attrsMap: { [key: string]: string | null };
parent: ASTElement | void;
children: Array<ASTNode>;
//......
}
declare type ASTExpression = {
type: 2;
expression: string;
text: string;
static?: boolean;
}
declare type ASTText = {
type: 3;
text: string;
static?: boolean;
}

我们看到 ASTNode 有三种形式:ASTElement,ASTText,ASTExpression。用属性 type 区分。

注意:为了避免文章过长,我在以上的代码中注释了 ASTElement 中的许多属性,点击上方 AST 数据结构的链接可查看完整代码。

VNode 数据结构

VNode 是 VDOM 中的概念,是真实 DOM 元素的简化版,与真实 DOM 元素是一一对应的关系。
我们看一下 Vue 2.0 源码中 VNode 数据结构 的定义:

1
2
3
4
5
6
7
8
9
10
11
12
13
14
15
16
17
18
19
20
constructor {
this.tag = tag //元素标签
this.data = data //属性
this.children = children //子元素列表
this.text = text
this.elm = elm //对应的真实 DOM 元素
this.ns = undefined
this.context = context
this.functionalContext = undefined
this.key = data && data.key
this.componentOptions = componentOptions
this.componentInstance = undefined
this.parent = undefined
this.raw = false
this.isStatic = false //是否被标记为静态节点
this.isRootInsert = true
this.isComment = false
this.isCloned = false
this.isOnce = false
}

本文中我们关注代码中后面带注释的属性,后面的 render function 的生成跟这些属性相关。可在实际的 Vue 项目中加一个断点,查看实际的 VNode 中这些属性的值。

document.createElement 的问题

我们为什么不直接使用原生 DOM 元素,而是使用真实 DOM 元素的简化版 VNode,最大的原因就是 document.createElement 这个方法创建的真实 DOM 元素会带来性能上的损失。我们来看一个 document.createElement 方法的例子:

1
2
3
4
let div = document.createElement('div');
for(let k in div) {
console.log(k);
}

打开 console 运行一下上面的代码,你会发现打印出来的属性多达 228 个,而这些属性有 90% 多对我们来说都是无用的。VNode 就是简化版的真实 DOM 元素,只将我们需要的属性拿过来,并新增了一些在 diff 过程中需要使用的属性,例如 isStatic。

render function

render function 顾名思义就是渲染函数,这个函数是通过编译模板文件得到的,其运行结果是 VNode。render function 与 JSX 类似,Vue 2.0 中除了 Template 也支持 JSX 的写法。大家可以使用 Vue.compile(template) 方法编译下面这段模板:

1
2
3
4
5
6
7
8
9
10
11
<div id="app">
<header>
<h1>I'm a template!</h1>
</header>
<p v-if="message">
{{ message }}
</p>
<p v-else>
No message.
</p>
</div>

方法会返回一个对象,对象中有 renderstaticRenderFns 两个值。看一下生成的 render function :

1
2
3
4
5
6
7
8
9
10
11
12
13
14
15
16
(function() {
with(this){
return _c('div',{ //创建一个 div 元素
attrs:{"id":"app"} //div 添加属性 id
},[
_m(0), //静态节点 header,此处对应 staticRenderFns 数组索引为 0 的 render function
_v(" "), //空的文本节点
(message) //三元表达式,判断 message 是否存在
//如果存在,创建 p 元素,元素里面有文本,值为 toString(message)
?_c('p',[_v("\n "+_s(message)+"\n ")])
//如果不存在,创建 p 元素,元素里面有文本,值为 No message.
:_c('p',[_v("\n No message.\n ")])
]
)
}
})

除了 render function,还有一个 staticRenderFns 数组,这个数组中的函数与 VDOM 中的 diff 算法优化相关,我们会在编译阶段给后面不会发生变化的 VNode 节点打上 static 为 true 的标签,那些被标记为静态节点的 VNode 就会单独生成 staticRenderFns 函数:

1
2
3
4
5
(function() { //上面 render function 中的 _m(0) 会调用这个方法
with(this){
return _c('header',[_c('h1',[_v("I'm a template!")])])
}
})

要看懂上面的 render function,只需要了解 _c,_m,_v,_s 这几个函数的定义,其中 _c 是 createElement,_m 是 renderStatic,_v 是 createTextVNode,_s 是 toString。除了这个 4 个函数,还有另外 10 个函数,我们可以在源码 src/core/instance/render.js 中可以查看这些函数的定义。

模板渲染的过程

有了上面这些基本概念的认知,接下来通过源码了解模板渲染的过程。

生命周期

阅读源码之前,我们首先介绍一下相关源码的目录。

src
|— compile 模板编译的代码,1.0 和 2.0 版本在模板编译这一块改动非常大
|— core/instance 生命周期,初始化入口
|— core/vdom 虚拟DOM
|— entries 编译入口文件

本文中涉及到模板渲染的代码以上目录中都有分布,其中我们重点讲解的 compile 和 patch 分别在 src/compile 和 src/core/vdom 目录中。

核心函数介绍

在上一篇博客《Vue2.0 源码阅读:响应式原理》中我们简单讲了 Vue 的生命周期,在 _init 函数的最后一步就是 $mount 方法。这个方法就是模板渲染的入口。我们看一下下面这张图:

上图中展示了模板渲染过程中涉及到的核心函数。我们可以通过 WebStrom 查看源码(按住 control 键单击方法名可以直接跳转,源码阅读神器),或者在浏览器中打断点一步一步查看代码运行的过程。

$mount 函数(src/entries/web-runtime-with-compiler.js),主要是获取 template,然后进入 compileToFunctions 函数。

compileToFunctions 函数(src/platforms/web/compiler/index.js),主要将 template 编译成 render 函数。首先读缓存,没有缓存就调用 compile 方法拿到 render function 的字符串形式,在通过 new Function 的方式生成 render function(基础概念中的 render function):

1
2
3
4
5
6
7
8
9
10
11
12
13
14
15
16
17
18
// 有缓存的话就直接在缓存里面拿
const key = options && options.delimiters
? String(options.delimiters) + template
: template
if (cache[key]) {
return cache[key]
}
const res = {}
const compiled = compile(template, options) // compile 后面会详细讲
res.render = makeFunction(compiled.render) //通过 new Function 的方式生成 render 函数并缓存
const l = compiled.staticRenderFns.length
res.staticRenderFns = new Array(l)
for (let i = 0; i < l; i++) {
res.staticRenderFns[i] = makeFunction(compiled.staticRenderFns[i])
}
......
}
return (cache[key] = res)

compile 函数(src/compiler/index.js)就是将 template 编译成 render 函数的字符串形式,后面一小节我们会详细讲到。

回到上面的 $mount 方法,源码最后又调用了 _mount 函数(src/core/instance/lifecycle.js):

1
2
3
4
5
6
7
8
9
10
11
12
13
14
15
16
17
// 触发 beforeMount 生命周期钩子
callHook(vm, 'beforeMount')
// 重点:新建一个 Watcher 并赋值给 vm._watcher
vm._watcher = new Watcher(vm, function updateComponent () {
//_update方法里会去调用 __patch__ 方法
//vm._render()会根据数据生成一个新的 vdom, vm.update() 则会对比新的 vdom 和当前 vdom,
//并把差异的部分渲染到真正的 DOM 树上。
vm._update(vm._render(), hydrating)
}, noop)
hydrating = false
// manually mounted instance, call mounted on self
// mounted is called for render-created child components in its inserted hook
if (vm.$vnode == null) {
vm._isMounted = true
callHook(vm, 'mounted')
}
return vm

在这个函数中出现了熟悉的 new Watcher,这一部分在上一篇博客《Vue2.0 源码阅读:响应式原理》中详细介绍过,主要是将模板与数据建立联系,所以说 Watcher 是模板渲染和数据之间的纽带。

至此,模板解析完成,拿到了 render function,也通过 Watcher 与将之数据联系在一起。

compile

上文中提到 compile 函数(src/compiler/index.js)就是将 template 编译成 render function 的字符串形式。这一小节我们就详细讲解这个函数:

1
2
3
4
5
6
7
8
9
10
11
12
13
export function compile (
template: string,
options: CompilerOptions
): CompiledResult {
const ast = parse(template.trim(), options) //1. parse
optimize(ast, options) //2.optimize
const code = generate(ast, options) //3.generate
return {
ast,
render: code.render,
staticRenderFns: code.staticRenderFns
}
}

这个函数主要有三个步骤组成:parseoptimizegenerate,最终输出一个包含 ast,render 和 staticRenderFns 的对象。

parse 函数(src/compiler/parser/index.js)采用了 jQuery 作者 John ResigHTML Parser ,将 template字符串解析成 AST。感兴趣的同学可以深入代码去了解原理。

optimize 函数(src/compiler/optimizer.js)主要功能就是标记静态节点,为后面 patch 过程中对比新旧 VNode 树形结构做优化。被标记为 static 的节点在后面的 diff 算法中会被直接忽略,不做详细的比较。

1
2
3
4
5
6
7
8
9
10
export function optimize (root: ?ASTElement, options: CompilerOptions) {
if (!root) return
// staticKeys 是那些认为不会被更改的ast的属性
isStaticKey = genStaticKeysCached(options.staticKeys || '')
isPlatformReservedTag = options.isReservedTag || no
// first pass: mark all non-static nodes.
markStatic(root)
// second pass: mark static roots.
markStaticRoots(root, false)
}

generate 函数(src/compiler/codegen/index.js)主要功能就是根据 AST 结构拼接生成 render function 的字符串。

1
2
3
4
5
6
7
const code = ast ? genElement(ast) : '_c("div")'
staticRenderFns = prevStaticRenderFns
onceCount = prevOnceCount
return {
render: `with(this){return ${code}}`, //最外层包一个 with(this) 之后返回
staticRenderFns: currentStaticRenderFns
}

其中 genElement 函数(src/compiler/codegen/index.js)是会根据 AST 的属性调用不同的方法生成字符串返回。

1
2
3
4
5
6
7
8
9
10
11
12
13
14
15
16
17
function genElement (el: ASTElement): string {
if (el.staticRoot && !el.staticProcessed) {
return genStatic(el)
} else if (el.once && !el.onceProcessed) {
return genOnce(el)
} else if (el.for && !el.forProcessed) {
return genFor(el)
} else if (el.if && !el.ifProcessed) {
return genIf(el)
} else if (el.tag === 'template' && !el.slotTarget) {
return genChildren(el) || 'void 0'
} else if (el.tag === 'slot') {
.................... //为避免文章过长,此处删除了部分代码,可以点击上方的 genElement 查看完成代码
}
return code
}
}

以上就是 compile 函数中三个核心步骤的介绍,compile 之后我们得到了 render function 的字符串形式,后面通过 new Function 得到真正的渲染函数。数据发现变化后,会执行 Watcher 中的 _update 函数(src/core/instance/lifecycle.js),_update 函数会执行这个渲染函数,输出一个新的 VNode 树形结构的数据。然后在调用 __patch__ 函数,拿这个新的 VNode 与旧的 VNode 进行对比,只有发生了变化的节点才会被更新到真实 DOM 树上。

1
2
3
4
5
6
7
8
9
10
11
12
13
14
15
16
17
18
19
20
21
//更新dom的方法,主要是调用 __patch__ 方法
Vue.prototype._update = function (vnode: VNode, hydrating?: boolean) {
const vm: Component = this
if (vm._isMounted) {
callHook(vm, 'beforeUpdate')
}
....................................
if (!prevVnode) {
// initial render
vm.$el = vm.__patch__(// 将vnode patch到真实节点上去
vm.$el, vnode, hydrating, false /* removeOnly */,
vm.$options._parentElm,
vm.$options._refElm
)
} else {
// updates
// __patch__ 方法在web-runtime.js中定义了,最终调用的是 core/vdom/patch.js 中的 createPatchFunction 方法
vm.$el = vm.__patch__(prevVnode, vnode)
}
.....................................
}

patch

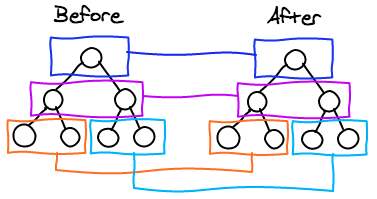
上一节我们提到了 __patch__ 函数最终会进入 src/core/vdom/patch.js。patch.js 就是新旧 VNode 对比的 diff 函数,diff 算法来源于 snabbdom,是 VDOM 思想的核心。对两个树结构进行完整的 diff 和 patch,复杂度增长为 O(n^3),而 snabbdom 的算法根据 DOM 操作跨层级增删节点较少的特点进行调整,将代码复杂度降到 O(n),算法比较如下图,它只会在同层级进行, 不会跨层级比较。

patch 函数(src/core/vdom/patch.js)的源码:

1
2
3
4
5
6
7
8
9
10
11
12
13
14
15
16
17
18
19
20
21
22
if (!oldVnode) {//如果没有旧的 VNode 节点,则意味着是 DOM 的初始化,直接创建真实 DOM
// empty mount (likely as component), create new root element
isInitialPatch = true
createElm(vnode, insertedVnodeQueue, parentElm, refElm)
} else {
const isRealElement = isDef(oldVnode.nodeType)
if (!isRealElement && sameVnode(oldVnode, vnode)) {//值得 patch
// patch existing root node
patchVnode(oldVnode, vnode, insertedVnodeQueue, removeOnly) //patch 算法入口
} else {
.....................................//为文章避免过长,涉及SSR的代码被注释掉了
const oldElm = oldVnode.elm
const parentElm = nodeOps.parentNode(oldElm)
//不值得 patch,直接移除 oldVNode,根据 newVNode 创建真实 DOM 添加到 parent 中
createElm(
vnode,
insertedVnodeQueue,
oldElm._leaveCb ? null : parentElm,
nodeOps.nextSibling(oldElm)
)
................................//点击上文的 patch 链接,查看完整代码
}

patchNode 函数(src/core/vdom/patch.js)与 updateChildren 函数(src/core/vdom/patch.js)形成的递归调用是 diff 算法的核心。

patchNode 核心代码:

1
2
3
4
5
6
7
8
9
10
11
12
13
14
15
16
// patch两个vnode的text和children
// 查看vnode.text定义
if (isUndef(vnode.text)) { //isUndef 就是判断参数是否未定义
if (isDef(oldCh) && isDef(ch)) {
if (oldCh !== ch) updateChildren(elm, oldCh, ch, insertedVnodeQueue, removeOnly) //递归调用
} else if (isDef(ch)) {
if (isDef(oldVnode.text)) nodeOps.setTextContent(elm, '')
addVnodes(elm, null, ch, 0, ch.length - 1, insertedVnodeQueue)
} else if (isDef(oldCh)) {
removeVnodes(elm, oldCh, 0, oldCh.length - 1)
} else if (isDef(oldVnode.text)) {
nodeOps.setTextContent(elm, '')
}
} else if (oldVnode.text !== vnode.text) {
nodeOps.setTextContent(elm, vnode.text)
}

updateChildren 函数是 diff 算法高效的核心,代码较长且密集,但是算法简单。遍历两个节点数组,维护四个变量 oldStartIdxoldEndIdxnewStartIdxnewEndIdx。算法步骤如下:

  1. 对比 oldStartVnode 和 newStartVnode,两者 elm 相对位置不变,若值得比较,则 patchVnode;
  2. 否则对比 oldEndVnode 和 newEndVnode,两者 elm 相对位置不变,若值得比较,则 patchVnode;
  3. 否则对比 oldStartVnode 和 newEndVnode,若值得比较说明 oldStartVnode.elm 向右移动了,那么 patchVnode,然后执行 api.insertBefore() 调整它的位置;
  4. 否则对比 oldEndVnode 和 newStartVnode,若值得比较说明 oldVnode.elm 向左移动了,那么 patchVnode,然后执行 api.insertBefore() 调整它的位置;
  5. 如果上面四种条件都不满足,则利用 vnode.key。先使用 createKeyToOldIdx 生成一个旧节点数组的索引表,如果新节点的 key 不存在这个表中说明是新节点,则添加;如果在则 patchVnode,然后在做一些调整免得影响后面的遍历;
  6. oldStartIdx > oldEndIdx 或者 newStartIdx > newOldStartIdx 的时候停止遍历;
  7. 如果 oldStartIdx > oldEndIdx 说明旧节点数组先遍历完,这时将剩余的新节点直接新建添加;
  8. 否则如果 newStartIdx > newEndIdx 说明新节点数组先遍历完,这时将剩余的旧节点直接删除。

核心代码:

1
2
3
4
5
6
7
8
9
10
11
12
13
14
15
16
17
18
19
20
21
22
23
24
25
26
27
28
29
30
31
32
33
34
35
36
37
38
39
40
41
42
43
44
45
46
47
48
49
50
51
52
53
54
55
while (oldStartIdx <= oldEndIdx && newStartIdx <= newEndIdx) {
if (isUndef(oldStartVnode)) {
oldStartVnode = oldCh[++oldStartIdx] // Vnode has been moved left
} else if (isUndef(oldEndVnode)) {
oldEndVnode = oldCh[--oldEndIdx]
} else if (sameVnode(oldStartVnode, newStartVnode)) {//新旧 VNode 四种比较
patchVnode(oldStartVnode, newStartVnode, insertedVnodeQueue)
oldStartVnode = oldCh[++oldStartIdx]
newStartVnode = newCh[++newStartIdx]
} else if (sameVnode(oldEndVnode, newEndVnode)) {
patchVnode(oldEndVnode, newEndVnode, insertedVnodeQueue)
oldEndVnode = oldCh[--oldEndIdx]
newEndVnode = newCh[--newEndIdx]
} else if (sameVnode(oldStartVnode, newEndVnode)) { // Vnode moved right
patchVnode(oldStartVnode, newEndVnode, insertedVnodeQueue)
canMove && nodeOps.insertBefore(parentElm, oldStartVnode.elm, nodeOps.nextSibling(oldEndVnode.elm))
oldStartVnode = oldCh[++oldStartIdx]
newEndVnode = newCh[--newEndIdx]
} else if (sameVnode(oldEndVnode, newStartVnode)) { // Vnode moved left
patchVnode(oldEndVnode, newStartVnode, insertedVnodeQueue)
canMove && nodeOps.insertBefore(parentElm, oldEndVnode.elm, oldStartVnode.elm)
oldEndVnode = oldCh[--oldEndIdx]
newStartVnode = newCh[++newStartIdx]
} else {
//如果4个条件都不满足,则利用 vnode.key 比较
if (isUndef(oldKeyToIdx)) oldKeyToIdx = createKeyToOldIdx(oldCh, oldStartIdx, oldEndIdx)
//先使用 createKeyToOldIdx 生成一个 index-key 表,然后根据这个表来进行更改。
idxInOld = isDef(newStartVnode.key) ? oldKeyToIdx[newStartVnode.key] : null
if (isUndef(idxInOld)) { // 如果 newVnode.key 不在表中,那么这个 newVnode 就是新的 vnode,将其插入
createElm(newStartVnode, insertedVnodeQueue, parentElm, oldStartVnode.elm)
newStartVnode = newCh[++newStartIdx]
} else {
// 如果 newVnode.key 在表中,那么对应的 oldVnode 存在,则 patchVnode,
// 并在 patch 之后,将这个 oldVnode 置为 undefined(oldCh[idxInOld] = undefined),
// 同时将 oldVnode.elm 位置变换到当前 oldStartIdx 之前,以免影响接下来的遍历
elmToMove = oldCh[idxInOld]
if (sameVnode(elmToMove, newStartVnode)) {
patchVnode(elmToMove, newStartVnode, insertedVnodeQueue)
oldCh[idxInOld] = undefined
canMove && nodeOps.insertBefore(parentElm, newStartVnode.elm, oldStartVnode.elm)
newStartVnode = newCh[++newStartIdx]
} else {
// same key but different element. treat as new element
createElm(newStartVnode, insertedVnodeQueue, parentElm, oldStartVnode.elm)
newStartVnode = newCh[++newStartIdx]
}
}
}
}
if (oldStartIdx > oldEndIdx) {//说明旧节点数组先遍历完,这时将剩余的新节点直接新建添加
refElm = isUndef(newCh[newEndIdx + 1]) ? null : newCh[newEndIdx + 1].elm
addVnodes(parentElm, refElm, newCh, newStartIdx, newEndIdx, insertedVnodeQueue)
} else if (newStartIdx > newEndIdx) {//说明新节点数组先遍历完,这时将剩余的旧节点直接删除
removeVnodes(parentElm, oldCh, oldStartIdx, oldEndIdx)
}

总结

模板渲染是 Vue 2.0 与 1.0 最大的不同。本文梳理了模板渲染的过程,重点讲解了其中的 compilepatch 函数

compile 函数主要是将 template 转换为 AST,优化 AST,再将 AST 转换为 render function;
render function 与数据通过 Watcher 产生关联;
在数据发生变化时调用 patch 函数,执行此 render 函数,生成新 VNode,与旧 VNode 进行 diff,最终更新 DOM 树。

扩展阅读